Astro-Knights Island
Astro-Knights is one of the newest adventures in Poptropica and it is one of the longest and most
involved. The basic story is that you must rescue a princess who has been
kidnapped. To rescue her, you need to assemble a spacecraft and then go on an
intergalactic quest to bring her back and save the Kingdom of Arturus. The
kingdom of Arturus is a medieval kingdom in the style of King Arthur and his
knights of the round table, but with space-age technology. This Poptropica
mission is a lot of fun, but very difficult. Fortunately, there are some great
Poptropica cheats and secrets to help you along the way. Here is a complete walkthrough for Astro-Knights island
in Poptropica.
Arrival in Arturus
You’ll arrive by ballon in Arturus. When you land, the first building you will
see is the House of Mordred, although it’s now called Mordred’s Museum. It was
once occupied by a powerful and mysterious sorcerer named Mordred and it
contains a number of things that he used while he lived here. Next to the house
is a large fountain with a spaceship statue in it and the statue and fountain
are dedicated to Mordred for bringing technology to the kingdom. The remaining
two buildings are the planetarium and the Crop Circle Inn. This final building
is a multiplayer room where you can battle other players and chat.
What to Do in Main Street
Proceed immediately to the fountain. In the water near the base of the spaceship
you will see something sparking and shiny. Jump up to get it and you will
discover that it is a coin. It will go into your backpack. Now go back to the
first building, the House of Mordred. Talk to the man you see when you enter and
get the pamphlet. Then use the coin in your backpack and he will tell you that
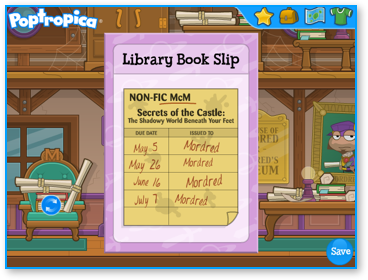
you are free to look around. Next, click on one of the books. The guy will ask
you not to touch them, but will give you a library slip. This library slip is a
clue to a hidden area. Pay attention to the underlined parts: McM.
you will see something sparking and shiny. Jump up to get it and you will
discover that it is a coin. It will go into your backpack. Now go back to the
first building, the House of Mordred. Talk to the man you see when you enter and
get the pamphlet. Then use the coin in your backpack and he will tell you that
you are free to look around. Next, click on one of the books. The guy will ask
you not to touch them, but will give you a library slip. This library slip is a
clue to a hidden area. Pay attention to the underlined parts: McM.
What to Do in Castle of Arturus
Next, go outside and run all the way to the right to the end of the area. Pass
through the short road and go right again. You will arrive at the Castle of
Arturus. Walk to the right and then go through the large double wooden door. Now go to the right and enter the
small wooden door. You will be inside the castle library. There are two books to
get. To pick them up, just walk over them. One is a green book on the far left
side of the room in the Fiction section. It is called, Mystical Book of Weapons. The second book
is The Life of Mordred – A Cautionary Tale. It is down the stairs in
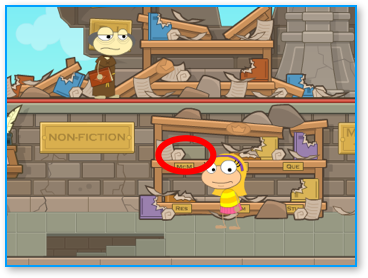
the non-fiction section on a book stand. After you get the second book, look at
the nameplates on the shelves. One is labeled McM, just like the underlined
section of the Library book slip you got earlier. Click on the
brick behind the nameplate and a secret staircase in the floor will open up.
through the short road and go right again. You will arrive at the Castle of
Arturus. Walk to the right and then go through the large double wooden door. Now go to the right and enter the
small wooden door. You will be inside the castle library. There are two books to
get. To pick them up, just walk over them. One is a green book on the far left
side of the room in the Fiction section. It is called, Mystical Book of Weapons. The second book
is The Life of Mordred – A Cautionary Tale. It is down the stairs in
the non-fiction section on a book stand. After you get the second book, look at
the nameplates on the shelves. One is labeled McM, just like the underlined
section of the Library book slip you got earlier. Click on the
brick behind the nameplate and a secret staircase in the floor will open up.
Go down the stairs and you will arrive in an underground room. Walk over the
moldy cheese on a plate right near the entrance. Then walk a little farther to
the right and click on the wooden handle on the wall. This will open up a small
grate near the ground over to the right, but not the one between you and the
robot in the cell. Click on the robot and he will say some long binary numbers
(all 1′s and 0′s). This can be translated and the correct way to translate it is
“bard”. Go back up the stairs.
When you return to the library, the librarian is there with two guards and is
unhappy with you for snooping around. Run out the library and return to the main
part of the castle. Go to the left and then enter the door by the staircase.
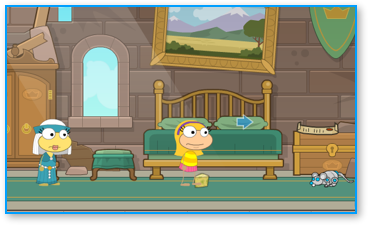
There is a robot mouse on the ground and a very unhappy girl here. Go to your
backpack and use the moldy cheese. The robot mouse will go for the cheese and
then you will capture him. Now go to the right and jump up on the chest next to
the bed. There is a letter on it. It is a secret messagethat says, We must change our
password! I feel my parents will find out what we are doing and put an end to
it!
moldy cheese on a plate right near the entrance. Then walk a little farther to
the right and click on the wooden handle on the wall. This will open up a small
grate near the ground over to the right, but not the one between you and the
robot in the cell. Click on the robot and he will say some long binary numbers
(all 1′s and 0′s). This can be translated and the correct way to translate it is
“bard”. Go back up the stairs.
When you return to the library, the librarian is there with two guards and is
unhappy with you for snooping around. Run out the library and return to the main
part of the castle. Go to the left and then enter the door by the staircase.
There is a robot mouse on the ground and a very unhappy girl here. Go to your
backpack and use the moldy cheese. The robot mouse will go for the cheese and
then you will capture him. Now go to the right and jump up on the chest next to
the bed. There is a letter on it. It is a secret messagethat says, We must change our
password! I feel my parents will find out what we are doing and put an end to
it!
Now leave the room, go up the stairs and enter the door at the very top. This is
where you’ll find the King and Queen, who are distraught over the kidnapping of
their daughter. Ask the Queen if she can think of anything else that might help
you and she will give you the coordinates of the three knights who left in
search of the princess. The coordinates are: X-73 Y-83,
X-15 Y-15, and X-83 Y-20. Go back outside the
castle and run to the right. Keep going right until you reach a new area, Ye
Olde Rumour Mille
What to Do in Ye Olde Rumour Mille
Talk to the hooded guy near the entrance and he will give you a Bag of Manure
(gross!). Then jump over the two hay bales and run up the hill to the door for
Ye Olde Rumour Mille. Go inside. Now walk to the left and jump up on the hay
bales. Then jump on the shelf and then up onto the gears and cogs. When you get
near the top, jump to the right to land on a small platform in the middle. You
will see a piece of rope hanging to the right. Jump onto this rope and this will
lift the wooden rod so that it is no longer attached to the gears. Slide down
the rope and you will land on a platform next to a very pale dark haired girl.
Click on her. She will ask to trade secrets, and will take the secret message
you found in the castle. In return, she will give you a piece of paper with
three cosmic symbols on it. It is the new password for the Secret Order. Jump
down off the platform and go outside.
To the right of the mill is the big wheel in the mud. On top of that wheel is
a coil of rope. Jump up on the wheel to get the rope. Now walk over to the left
and stand underneath the Ye Olde Rumour Mille sign. Jump up on top of the sign
and then jump up on top of one of the windmill blades to get it to start
spinning. Keep moving around and jumping on the blades to spin them around until
the little glass bubble on the roof is completely open. When it is open, go
inside it.
Inside the windmill you will find a broken hover craft. It needs something to
power it. Fortunately, you have something. Open up your backpack and Use the bag
of manure. The hover craft will fly out of the roof and land in the mud outside.
Go back out of the ceiling to leave the windmill. Before you use the hover
craft, though, there’s work to be done back at the castle.
What to Do in the Princess’s Tower
OK, head back to the castle and then stand in front of the large oak door.
Jump up onto the windowsill and then jump onto the platform with a large bow and
arrow on it. Then go to your backpack and select Use on the coild of rope. The
rope will be attached to the arrow. Now point the arrow in about a 45 degree
angle to the left and click to shoot the arrow and rope. If you aimed correctly,
the arrow will stick into the door of a nearby tower. Now walk across the rope
and enter the door in the tower.
Go to the left past the bed and you will see some brown paper sticking out of
a chest with scrolls and parchment inside. The brown paper says,
The order believes the Great Inventor kept many of his secrets under his bed,
but the order dare not come out of their hiding place to seek them. I will do my
best to aid them in their search because I believe Mordred is alive! I’ve
detected a veacon on a faraway planet, and I believe it may have come from him.
I have sent a return signal, and…
Once you have the paper in your backpack, head back outside of the tower and
then go left until you reach the fountain in the middle of the square.
What to Do in the Secret Entrance
Now that you’re back near the fountain, walk into the middle of it and click
on the plaque on the wall that has the space symbols. Select the symbols in this
order: Crescent Moon, Planet with Rings, 5-pointed star. Then click on the large
Sun in the middle. A secret door will open and the water will drain out of the
fountain. Go inside the entrance.
You’ve found a secret order. There are several people here wearing purple
robes. Walk to the right and talk to the boy with buck teeth and pimples. He
will give you a small key. Now get back on the rope and head out of this secret
room.
What to Do in Mordred’s Secret Hideout
When you’re back standing next to the fountain, walk left to Mordred’s Museum
and go inside. Go up onto the top floor and then click underneath the bed.
You’ll find a missing page from Mordred’s Journal. It says:
I have found a nearby moon with much activity that I believe to be alien
life! I have found that animal waster makes decent fuel, and there is just
enough manure in Arturus to bring my flying craft to the moon. The coordinates
are 56,52
Leave the museum and go back to the guy with the shovel who gave you the
manure. Next to him are two bales of hay. Push them all the way to the right and
then jump on top and stand between them. You should fall down to the ground.
Then push the left bale back to the left side and you will reveal a secret
locked trap door in the ground. Use the small key in your backpack to open it
and go down.
Slide down the rope and then walk up to the mechanical owl. It will fly
outside. Go back up the rope to follow the owl. Release the mechanical mouse from your backpack and the owl
will fly down and eat it. CHOMP! Now the owl will be your friend and follow you
around. If you click on the owl you can tell it where to fly.
Go back down the trap door and then walk left. Pick up the book that is
sitting on the chair. This is Mordred’s Journal. Then walk all the way to the
left and keep pushing against the wall. After a few seconds it will crumble into
pieces. Go all the way to the left and you will see a small hole. Go through it
to enter the cell where you found the robot. He will self-destruct and a fuel
rod will fly to the left beyond the bars. You can’t reach it by yourself, but
your new friend the owl can! Click on the owl and then click on the green rod
and the owl will retrieve it for you. Click on the owl and then click on
yourself and your owl will give you the rod.
What to Do with the Space Craft (Excalibur)
Go back through the hole and exit the secret hideout. Go to the right until you
get to the windmill and you will see the hover craft that you found earlier.
Jump onto the hovercraft and head to the right. You will find a spacecraft named
Exaclibur. Click on the spacecraft and you will see a control panel. Drag the
green fuel rod in the bottom left corner to the bottom right corner where you
see a broken one that is dripping. Then enter the coordinates for the moon that
you found earlier. They are 56-52. You enter the coordinates by
spinning the two dials on the right. Once you’ve done that, press the red Launch
button to take off!
What to Do on Pewter Moon
Your new spaceship will run out of fuel and crash land on the nearby moon. Go
to the right and jump on the platform in the middle of the Astrozone building
and then go inside. Talk to the guy on the left. Ask him how to get off this
planet. He’ll tell you to leave your ship for scrap and then build a new one on
the holopad.
Go outside and click on the Holopad machine to the left. There’s a big sign
over it that says, Build Your Own Rocket Here. You can design your own
rocket anyway you like. The most important thing is to balance your speed and
shield. It will probably help to have a little more speed than shield, but you
can probably survive the other way too. When you like your ship, click on the
Done button and your rocket ship will be waiting for you on the launch pad
nearby. Enter your new rocket ship to continue your adventure.
What to Do in Your Rocket
Click on launch to take off into space. There are three planets to visit and you
can do them in whatever order you like. To fly the ship, just move your mouse
cursor around. You can shoot your weapon by clicking. Pay attention to the
coordinates in the bottom left. When you get into alien space, watch out because
other ships may start to attack you.
Jungle Planet-The coordinates for Jungle Planet are 15,15. When you get
near, an alien ship will start attacking you, so click on the planet as soon as
you can. Once you arrive on land, exit your ship onto a platform and then drop
all the way down onto the ground. Walk to the right and you will see a small
platform with a weapon in a spotlight. Walk over to it to pick it up and put it
into your backpack. It is a laser lance and it can release a destructive burst
of energy when fully charged.
Next go to the left and jump on top of one of the flowers. They will catapult
you into the air. Keep jumping until you reach your spaceship again. Up above
you is a little green bug with yellow electrical charges shooting between his
arms. The will zap you if you get too close. Watch for the swinging pendulum to
your right and jump on it as it’s moving away from you (so that you
don’t get zapped). Wait for the platform you’re on to go all the way to the
right and then start swinging back. Then jump and you will land safely on the
next platform. Keep doing this until you get ot a platform on the right and then
jump off it. It might take a few tries to get this right. When you’re on the
platform, go all the way to the right.
Next, you’ll find a knight in green armor. He is Sir Cador and he has failed
in his rescue of the princess and he will tell you that you should try to get
into the cage to rescue the princess. Click up the rope and then wait for the
first egg to open. Then jump and if you timed it well, you will land on the egg
when it closes again. Wait here until the next egg is open and then jump again.
On this egg, jump immediately because it opens again very quickly. Jump onto the
next egg and then jump onto the cage with a winged unicorn inside. Click on the
cage to open it and then click on the Unicorn again. The mother phoenix will
approach and you will play a game where you must defeat it with the laser lance
while riding the flying unicorn.
This game can be really hard. You need to avoid the flying bugs, rocket
missiles and lightning clouds. You can shoot the bugs but just get out of the
way of the storm clouds and the red phoenix missiles that come at you. After a
while, the mother phoenix appears. She will open her mouth and then you need to
shoot a fully charged shot from your laser lance and hit her in
the head. To do a fully charged shot, click and hold your mouse button until the
tip lights up green and then fire. It’s helpful to charge up your lance before
she arrives each time so that you’re ready to shoot. After you shoot, get out of
the way of her rocket missiles. Also, be careful because sometimes instead of
appearing on the right side of the screen, she will sneak up behind you.
After you hit her three times in the head with a fully charged shot from your
lance, she will destruct and you will return to the green knight. He will now
accompany you on your mission. Once you are back in your ship, click Launch and
then press the Teleport Home button.
Fire Planet-Go to the upper right to head towards the fire planet. It is located at the
coordinates 83,20. Watch out because along the way you will
encounter a black hole that you must navigate around. And just like with the
Jungle Planet, the area around the Fire Planet has space aliens who will attack
you. Once you land on the planet, exit your rocket ship.
You will be standing outside on a platform surrounded by hot lava. If you
fall into you you will be sent back to the starting platform. Move to the right,
jumping from platform to platform. Note: it is always easier to
jump to the next platform when it is moving downwards. This is
especially true for the last platform. When you get to the final platform, wait
for it to get to the top of the volcano and then jump off to the left. You’ll
land at the top of the volcano crater and can then go down inside.
Once you’re inside the volcano, you need to make your way through the caverns
while avoiding the yellow steam that goes by. If you are touched by the steam,
you get sent back all the way to the beginning and have to start over again.
They key here is patience. There are little alcoves along the way where you can
wait safely for the steam to pass. As soon as it disappears, make your move to
the next safe spot. Once you get to a larger open area, the steam stops coming.
But now there is a rolling rock creature that blocks you from passing. Time your
jump to go over him just as he’s rolled up into a circle and you should be able
to get by. Once you get past him, you’ll meet up with the Red Knight, named Sir
Pellas. He will tell you that he failed and that a beast is holding the
princess. He will give you an ice arrow to slay the beast.
When you enter the room to the left, move quickly to the first chain and jump
up and climb it to the top. Then move from chain to chain until you reach the
end. Drop down and run under the dropping spike ball from the dragon’s tail.
Then click on the lever to temporarily shut down the robot dragon. Move quickly
to the right so that you have a clear shot to the dragon’s open mouth. Click on
your ice arrow and shoot it into the dragon’s mouth. If you hit him
successfully, he will turn orange and red and start jumping up and down. This
will cause stalactites to start falling from the ceiling, but the dragon will
stop shooting fireballs at you and his spike tail will stop working. If you move
quickly enough, you can go across the chains again (just watch out for the
stalactites) and get under him before he reactivates. Then just flip the lever,
move, and shoot him again. Tip: after you flip the lever, don’t
wait for the spinning cursor to stop. Move to the right immediately so you will
have enough time to position and shoot the ice arrow before the dragon moves his
mouth. Shoot the dragon three times to defeat him.
Once you beat the mechanical dragon, the red knight will come into the room
with you and join you on your mission. Return to your spaceship and teleport
home.
Ice Planet-Head southeast to coordinates 73,83. When you arrive, you
will find space sharks guarding the planet. You need to lure them into a trap.
Shoot all of them to get them to follow you and then lead them to the black hole
located to the north. The coordinates for the black hole are approximately
84,47. When you’re luring them away, keep them close enough to stay on screen or
they will go back to guarding the ice planet.
Once the space sharks have been dealt with, you can land the ship on the Ice
Planet. When you exit the ship, you’ll be standing on a platform above ice
water. Just like the lava from the Fire Planet, if you fall into the water,
you’ll be teleported back to your ship. Move from platform to platform while
watching out for the flying robot fish. It’s a little tough to move from
platform to platform and you will slide a bit because it’s ice. You should aim
for the middle of each platform when jumping so that you don’t slide off when
you land.
In the next part, jump up on the platforms to climb the mountain while
avoiding the giant snow balls. This part is much easier than the ice platforms
from before. Sir Gawain, the blue knight, is standing at the very top of the
moountain. Talk to him and he will give you a special force shield. You will
then have to fight a giant tiger-shaped helicopter that drops snowballs on you.
Using the force field, you can bounce the snowballs back at him to damage the
helicopter. You need to hit him three times. From time to time, ice shards will
fly towards you and they will damage your shield, so watch out. If the shield
runs out it will need to recharge and you will be defenseless for a while. Just
avoid everything when this happens. After you defeat the tiger helicopter, the
blue knight will appear and he will join you.
Go back into your ship and teleport home. Now you can go to the Crystal
Gate…
The Crystal Gate
The Crystal Gate is an asteroid at the coordinates 11,82.
You can go there once you have found all three knights. The the Crystal Gate is
surrounded by an asteroid belt, so you need to be careful when you get near it.
Once you land exit the space craft. Climb up the crystal mountain to the top
where the 3 knights are waiting. Click on the sword that is stuck in the stone.
You will open a small vortex that you can enter.
You arrive at the castle of the Binary Bard. Jump down to the bottom of the
castle and speak with the princess. She will ask for the three powerful weapons
you have brought and then she will take them from you. But once she does, she
will reveal herself as the Binary Bard in disguise! He will then laugh at you
and disappear.
There is a wall next to you. Click on it and it will become a puzzle. When
you click on a square, it will stay the same but flip over the adjacent squares.
The goal is to turn over all of the pieces. It’s a little tricky, but you should
be able to do this puzzle with a little experimentation and practice.
The Final King Mordred Battle
Welcome to the final battle. This is really hard and takes place in two
parts. Your health meter doesn’t reset between them, so you need to do the first
part as carefully as you can. In the first part, you will fly around as Merlin
the robot owl. Be careful to avoid the spinning discs and Mordred’s zaps and
robot arms. The goal is to pick up the black bombs that Mordred drops on the
ground and then fly above him. When they start blinking red, wait a few seconds
and then release them so that they explode on him. When you get two bombs on
Mordred he will zap and kill Merlin. (Sob!) Goodbye, Merlin!
Now comes the really hard part. Try to get Mordred close to the platform
where the real princess is trapped. Then jump up on him and then up onto the
platform. Stand on the edge and then do a big jump to either the left or the
right. If you timed it right, you’ll land on one of the chandeliers. Now move
yourself so you are in the middle. He will go underneath the chandelier and fire
his laser at it. It will fall on top of him. Repeat this on the other chandelier
and then you will destory Mordred. He will emerge again but the princess will
finish him off.
Once that’s complete, the mission is finally over! You have rescued the
princess and will receive the Astro-Knights medal. Congratulations!
